adiary
Raspberry pi で CMS をやろうとして、はて、何がインストールできるのかと。
そのやったことをダラダラ書いてみた。
要点は、あとで別にまとめたい。
ちなみに CMS (Contents Management System) とは、ブログとかコミュニティサイトとか、何かのコンテンツを、HTML等の専門的な知識なしで投稿し、公開できるアプリだと思ってもらえれば外れてないはず。
一応、外部へ公開してない Raspberry Pi (ホスト名:Rasp101) へログインし、ブログアプリをチェック。
$ sudo apt-get update
$ sudo apt-cache search blog | grep blog | egrep -v "liblo|client"
blazeblogger - simple to use, command line based, content management system
blosxom - light, feature-packed weblog app with plugin extensibility
bti - command line micro-blogging tool
chalow - weblog tool that converts ChangeLog to HTML
chronicle - HTML & RSS blog compiler
feed2omb - Announces new articles in a feed to an open microblogging service
gnome-blog - GNOME application to post to weblog entries
jekyll - Simple, blog aware, static site generator
libmicroblog4 - library for using the Microblog Akonadi Resource
libmojomojo-perl - wiki- and blog-inspired content management system
mahara - Electronic portfolio, weblog, and resume builder
mahara-apache2 - Electronic portfolio, weblog, and resume builder - apache2 configuration
mnemosyne-blog - Maildir-to-blog compiler with XML templating and Python extensions
movabletype-opensource - Well-known blogging engine
nanoblogger - Small weblog engine for the command line
nanoblogger-extra - Nanoblogger plugins
pidgin-microblog - Microblogging plugins for Pidgin
pidgin-microblog-dbg - Microblogging plugins for Pidgin (debugging symbols)
pyblosxom - a lightweight file-based weblog system
python-wordpresslib - Python module to connect to Wordpress blogs using XML-RPC protocol
td2planet - Ruby-based server-side blog aggregator
tdiary - Communication-friendly weblog system
ucblogo - a dialect of lisp using turtle graphics famous for teaching kids
webauth-weblogin - Central login server for WebAuth authentication
wfo - Offline editing tool for Wiki pages and blogs
wordpress - weblog manager
wordpress-l10n - weblog manager - language files
zine - Python powered blog engine
mahara-mediaplayer - Electronic portfolio, weblog, and resume builder - internal media player
client の文字があるものとかは弾いたけれど、パッケージをよく見ると Twitter クライアント(micro-blog)の bti なんていうのもあるみたいね。
興味は引かれたけど、今回はパス。
まぁ、やっぱりあるよねぇ movabletype とか wordpress とか。
で、気になったのが tDiary というアプリ。
名前でググってみると、http://www.tdiary.org/ というサイトが引っ掛かった。
お、日本で開発されてるとか、良さげじゃない?
一応、もう少し検索してみるかと思って、「raspberry pi cms」でググってみる。
こんなサイトが引っ掛かった。
「元々Movable TypeやtDiaryの置き換えとして生まれ」たらしい。
ふぅむ……
tDiary も気になるけど、はてなダイアリーが移行できそうな aDiary が気になる。
ちと試してみるか。
ってことで、ソースをダウンロード。
$ cd /usr/local/src
$ sudo git clone https://github.com/nabe-abk/adiary
$ cd adiary/
$ view adiary.conf.cgi.sample
#!/usr/bin/perl
(中略)
# ・ディレクトリを変更する場合は、配布物中のファイルの置き場も変更してください
(以下略)
……あ、これ /usr/local/src へのダウンロードじゃ、ダメなやつだ。
$ head -1 *.cgi
==> adiary.cgi <==
#!/usr/bin/perl

==> adiary.mod.cgi <==
#!/usr/bin/perl

==> adiary.speedy.cgi <==
#!/usr/bin/speedy
念のためシバン (shebang) を確認したら、なんだ speedy って?
perl とともに、Raspberry pi に入っているのか?
なきゃ探すしかなさそうだけども。
$ type perl speedy
perl は /usr/bin/perl です
-bash: type: speedy: 見つかりません
$ sudo apt-cache search speedy
libapache2-mod-speedycgi - apache2 module to speed up perl scripts by making them persistent
libclass-accessor-classy-perl - Perl module providing minimalist, fast accessors
libcrypt-ciphersaber-perl - Perl module implementing CipherSaber encryption
libjs-polymaps - JavaScript library for image- and vector-tiled maps
medusa - fast, parallel, modular, login brute-forcer for network services
netsend - a speedy filetransfer and network diagnostic program
python-routes - Routing Recognition and Generation Tools
speedy-cgi-perl - speed up perl scripts by making them persistent
vowpal-wabbit - fast and scalable online machine learning algorithm
$ sudo apt-cache show speedy-cgi-perl
Package: speedy-cgi-perl
Version: 2.22-13
Architecture: armhf
Maintainer: Niko Tyni <ntyni@debian.org>
Installed-Size: 278
Depends: perl (>= 5.14.2-9), libc6 (>= 2.13-28), libperl5.14 (>= 5.14.2)
Homepage: http://daemoninc.com/SpeedyCGI/
Priority: optional
Section: perl
Filename: pool/main/s/speedy-cgi-perl/speedy-cgi-perl_2.22-13_armhf.deb
Size: 119882
SHA256: f40b7530ef4ac6f55b457a05246a024e4f7f15f36df9e01fa078ccda58835374
SHA1: d3a6a62f3e8f0d998d84709cc5828933bf0ef9de
MD5sum: 1f1cc00a3ec8ed27905921e780138e3a
Description: speed up perl scripts by making them persistent
 SpeedyCGI is a way to run perl scripts persistently, which usually makes
 them run much more quickly because it avoids the overhead of starting
 up a new perl interpreter and compiling the perl code.  It is also known
 as PersistentPerl: while its most common use is with CGI scripts, it can
 be used to speed up most perl programs.
うん。
http://daemoninc.com/SpeedyCGI/ を参照してみたら #!/usr/bin/speedy の記述があったので、これを入れればヨサゲ。
$ sudo apt-get install speedy-cgi-perl
(中略)
$ type speedy
speedy は /usr/bin/speedy です
おっけー。
も少し事前準備してみる。
$ sudo apt-get dist-upgrade
$ cd /var
$ sudo cp -r /usr/local/src/adiary/ .
$ cd /etc/apache2/sites-available
$ cp -p default adiary
$ sudo vi adiary
---------------------
<VirtualHost *:80>
        ServerName example.jp
        ServerAdmin webmaster@example.jp
        DocumentRoot /var/adiary
        <Directory /var/adiary/>
                Options ExecCGI Includes -Indexes -FollowSymLinks MultiViews
                AllowOverride Options
                Order allow,deny
                allow from all
        </Directory>
        ErrorLog ${APACHE_LOG_DIR}/ex.error.log
        CustomLog ${APACHE_LOG_DIR}/ex.access.log combined
</VirtualHost>
(名前ベースのバーチャルホスト設定のため、いろいろ書き換え……。
  Options 等は、サーバ公開するときに再検討する)
---------------------
$ sudo a2ensite
adiary
$ cd /etc/apache2/mods-available
$ sudo vi mime.conf
---------------------
AddHandler cgi-script .cgi
(コメントアウトされているので、アンコメントを行う)
---------------------
$ sudo service apache2 reload
apache2 の実行ユーザは誰なんだろうと思って /etc/apache2/apache2.conf を見ると /etc/apache2/envvars で設定されていると書かれていた。
# These need to be set in /etc/apache2/envvars
User ${APACHE_RUN_USER}
Group ${APACHE_RUN_GROUP}
では、/etc/apache2/envvars も見てみる。
$ grep APACHE_RUN /etc/apache2/envvars
export APACHE_RUN_USER=www-data
export APACHE_RUN_GROUP=www-data
export APACHE_RUN_DIR=/var/run/apache2$SUFFIX
なるほど。
わかったところでおもむろに自宅内 LAN の DNS 設定へ example.jp で該当 Raspberry Pi へアクセスできるように名前設定。
ローカルネットワークから example.jp へアクセスすると、今回構築している aDiary にアクセスすることになる。
僕の場合は、Android を含む家庭内の複数の端末からアクセスするのに不便だから DNS を構築しているだけなので、Windows なら c:\windows\system32\drivers\etc\hosts に追記した方が早いかも。
$ cd /var/adiary
$ sudo chmod -R o-x .
$ sudo chown -R www-data:www-data .
この時点で、一度 example.jp へアクセスしてみる。

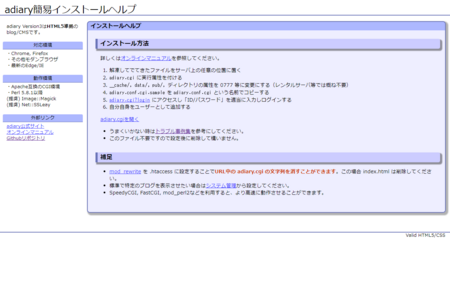
「adiary簡易インストールヘルプ」なるものが表示されたので、内容を読んでみる。
- 解凍してでてきたファイルをサーバ上の任意の位置に置く
- adiary.cgi に実行属性を付ける
- __cache/, data/, pub/, ディレクトリの属性を 0777 等に変更にする(レンタルサーバ等では概ね不要)
- adiary.conf.cgi.sample を adiary.conf.cgi という名前でコピーする
- adiary.cgi?login にアクセスし「ID/パスワード」を適当に入力しログインする
- 自分自身をユーザーとして追加する
うーん、git で持ってきている現状、2つ目までは問題ないっぽい。
3つ目の 0777 へ設定変更が必要なディレクトリの中を見てみると、どうもデータを置くだけっぽい。
$ sudo su - www-data
$ cd /var/adiary
$ ls -l data
合計 4
-rw-r--r-- 1 www-data www-data 454 11月 27 23:40 index.html
あれ…… index.html があるんだ。
ちょこっと http://example.jp/data にアクセスしてみる。
……げ。
Internal Server Error とともに、バージョン情報が思いっきり出力されてるw
さくっと消しておこう……。
$ exit (www-data から抜けて sudoers ユーザに戻る)
$ cd /etc/apache2
$ grep ServerSignature apache2.conf
ふむふむ。
ここに書いてないってことは、どこか外部ファイルに出しているんだろうな……と。
$ grep ServerSignature conf.d/*
conf.d/localized-error-pages:# ServerAdmin email address regardless of the setting of ServerSignature.
conf.d/security:#ServerSignature Off
conf.d/security:ServerSignature On
$ sudo cp -p conf.d/security /tmp/security
$ sudo vi conf.d/security
$ sudo diff conf.d/security /tmp/security
38,39c38,39
< ServerSignature Off
< #ServerSignature On
---
> #ServerSignature Off
> ServerSignature On
$ sudo rm -i /tmp/security
$ sudo service apache2 reload
/etc/apache2/conf.d の下では、不要なファイルを削除しておかないと読み込んでしまうからね……。
でも、これでバージョン情報が消えるはず。
http://example.jp/data
http://example.jp/__cache
http://example.jp/pub
はい、消えた。
もう一度 www-data に su して、続きの作業を行う。
ls -ld __cache/ data/ pub/
$ sudo su - www-data
$ cd /var/adiary
$ ls -ld __cache/ data/ pub/
drwxr-x--- 2 www-data www-data 4096 11月 28 02:11 __cache/
drwxr-x--- 4 www-data www-data 4096 11月 28 02:08 data/
drwxr-x--- 3 www-data www-data 4096 11月 28 02:08 pub/
$ cp adiary.conf.cgi.sample adiary.conf.cgi
$ view adiary.conf.cgi
〇 の項目はともかく、● の項目は一度チェックしておいた方がいいね。
パスワードの最低文字数が 4 とか書いてあるし。
でもいまは動くのを確認するのが最優先なので、放置。
http://example.jp/adiary.cgi?login
……「ID/パスワード」を適当に入力しログインするって書いてあったけど、なんでも良いのかな。
https://adiary.org/v3man/install/ を参照してみる。
うん、右上のログインから「ID/パスワード」を適当に入力って書いてあったので、なんでもいいみたい。
何入れても、root でログインしたことになってた。

で、任意の名前で管理者ユーザの登録を行うと、またログイン画面に戻された。
今さっき登録したアカウントでログインし直してみると、ちゃんと管理メニュー画面になったよ。
……ねぇ。
ちょっとボヤいてもいいよね。
インストールはたったの 4 行と書いてあったけどさぁ。
これだけの事前準備が必要で、何が 4 行なん?
少なくとも git コマンドでダウンロードするディレクトリは、指定しなきゃダメじゃん。
……はぁ(溜息)
気を取り直して、インストールマニュアルの書かれた index.html は、これに書き換えておこう。
<html>
  <head>
    <meta http-equiv="Refresh" content="0;URL=adiary.cgi">
  </head>
</html>
こうしたら、http://example.jp/ へアクセスしただけで、すぐに http://example.jp/adiary.cgi に画面が変わるようになる。
今日はここまでにしておこう……疲れた。
